This is Part 3 of a 3-part blog, where we shall look at the newly launched K60W/40W/20W Power Switchable Laser Module from Lasertree.
Setting Up
You will need to focus the laser module to a specific height in relation to the thickness of the material you are cutting. This focuses the laser beam to the centre of the material, maximising the cutting depth on each pass. Below is an extract from the page 12 of the LaserTree Manual (4. Focus Reference Settings)
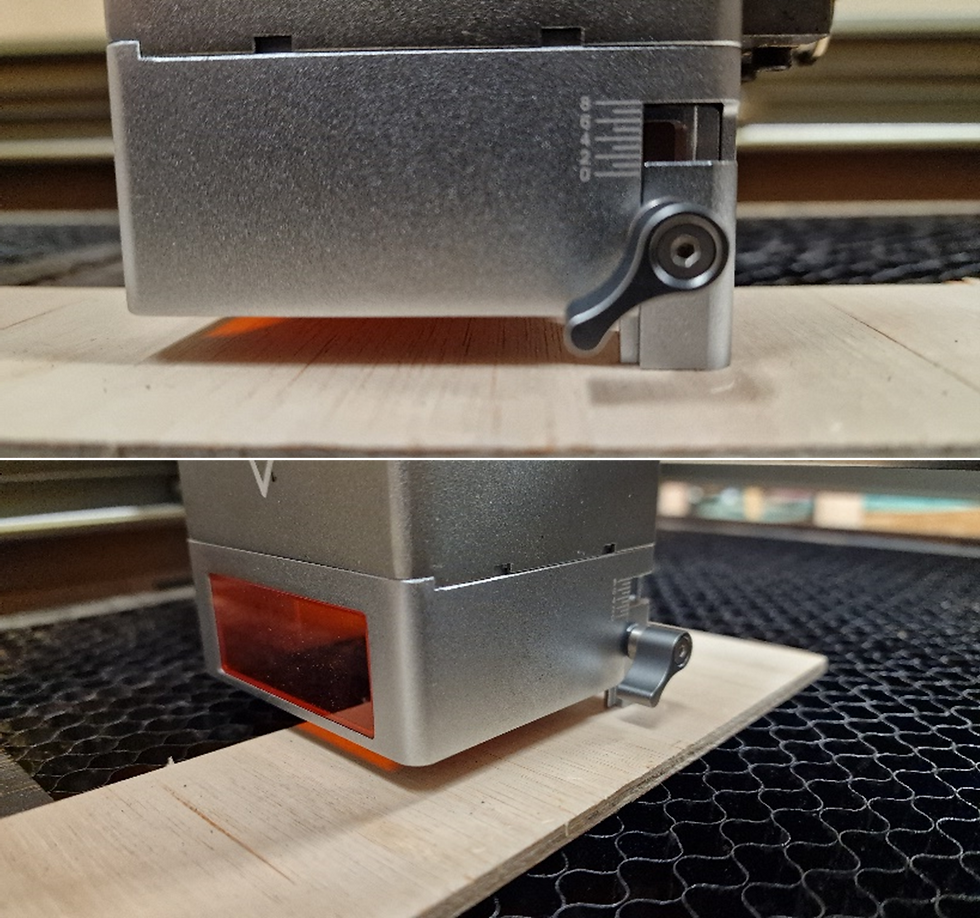
Reference Settings For Cutting
Material Thickness | <5 mm | 5 mm | 8 mm | 10 mm | 12 mm | 15 mm | >30 mm |
Fixed Focus Lever | 0 mm | 2 mm | 4 mm | 5 mm | 6 mm | 7 mm | 7 mm |
*Extract from Laser Tree K60 User Manual
Test Performance Results (Using 60W Setting Only)
We only tested the laser module on hardwood ply and poplar ply. We do know that this laser module is very capable of cutting and engraving other materials like coloured acrylic, leather etc. Our primary interest is in the lasers ability to cut and engrave wood, so that will be the focus of this blog.
5 mm Thick Hardwood Ply (Sourced From B&Q)
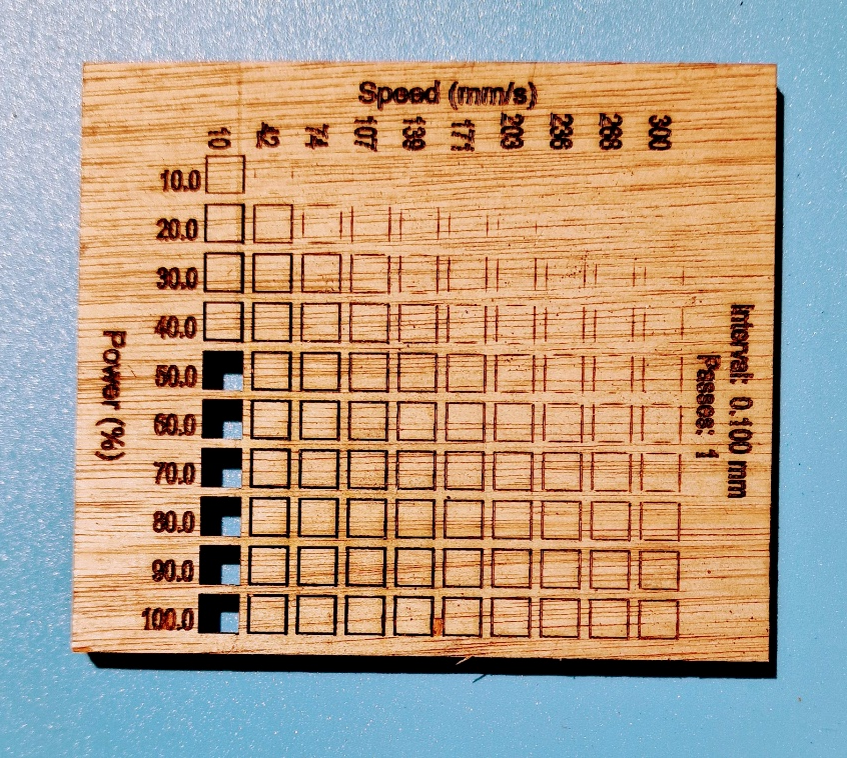
In the first picture the speed intervals are spaced apart to give some overview of the cutting and engraving ability.
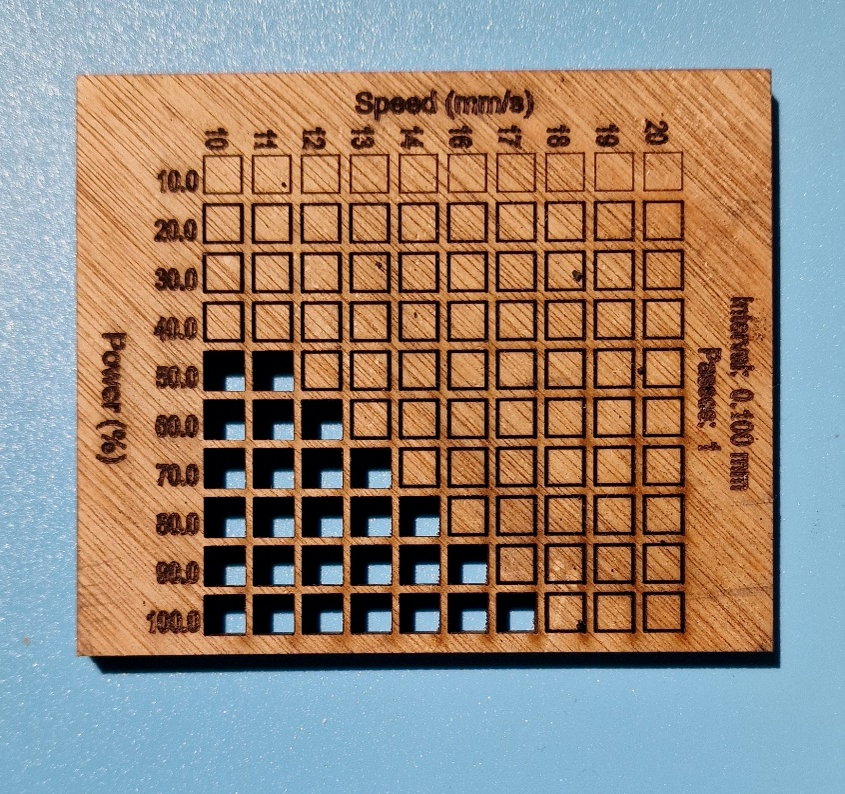
In this second picture the speed intervals are set in increments of 1 mm/s, so you can see the best cutting performance, which we found to be 17 mm/s at 100% power. If we compare this to the XTool 40W Laser module, the best performance there, was 6 mm/s at 100% power. This places the Laser Tree module nearly 3 times faster.
9 mm Thick Hardwood Ply (Sourced From B&Q)
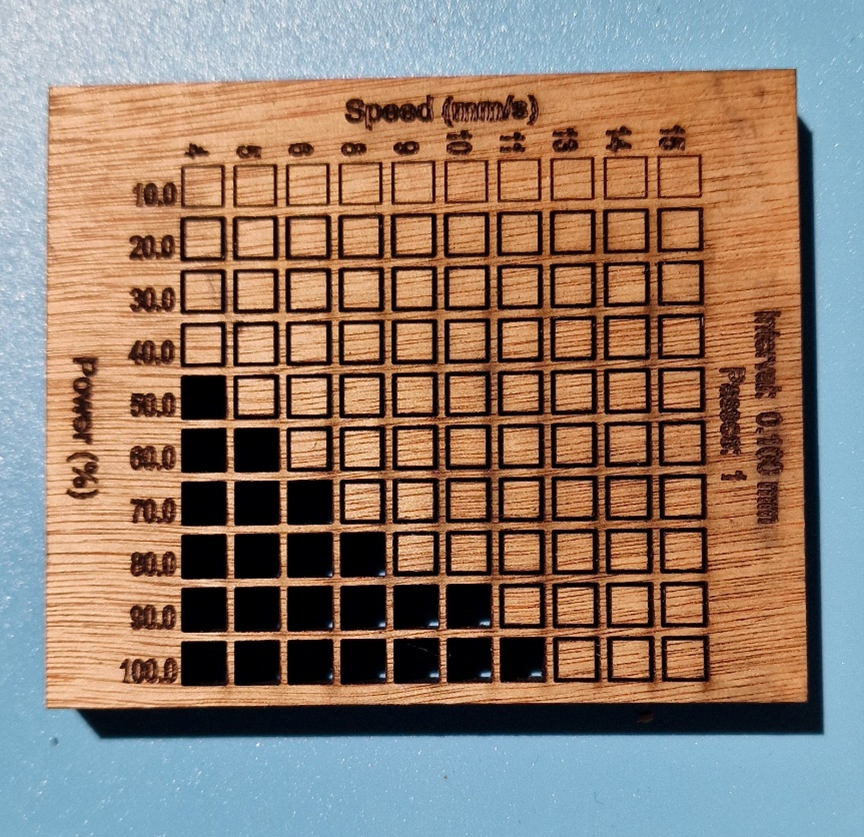
We managed to cut through the 9 mm thick hardwood ply at 11 mm/s in one pass with power set at 100%. If we again compare this to the XTool 40W Laser module, it will need to run at 4 mm/s at 100%. Even sometimes it would need two passes. This again verifies as being nearly 3 times faster.

The Laser Tree module managed to cut through this 12 mm thick hardwood ply in one pass at 6 mm/s with 100% power. Normally this would take 2/3 passes at 4 mm/s using the XTool 40W laser module.
9 mm Thick Poplar Ply (Sourced From Kritronics Ltd)
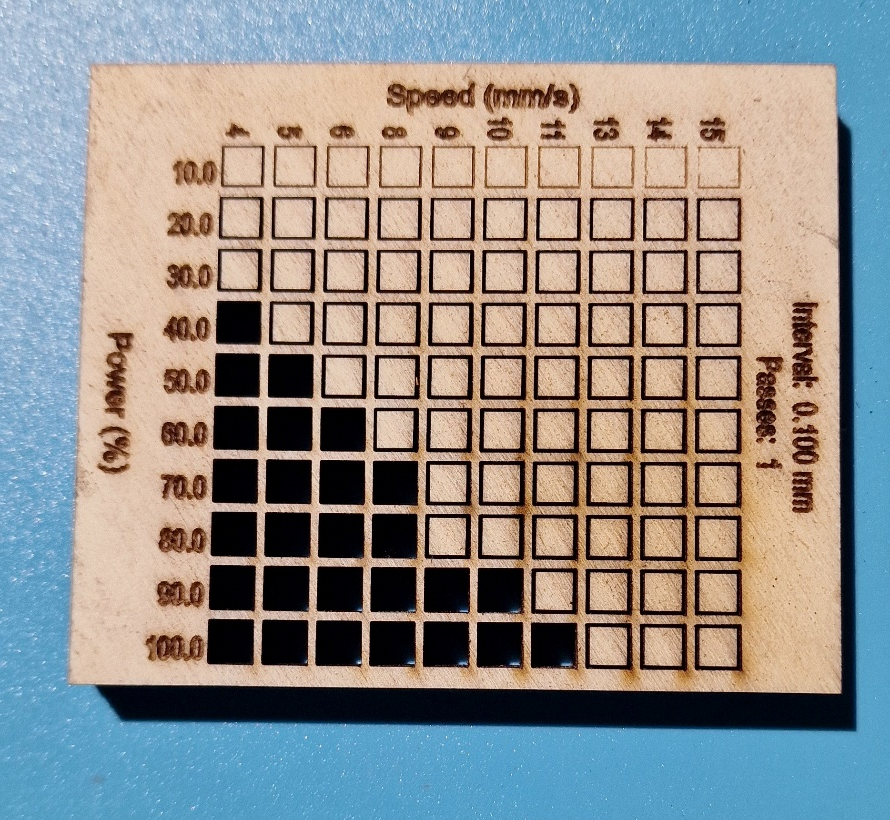
Poplar Ply is a very nice material to cut. You can see here, it managed to do this comfortably at 11 mm/s at 100% power. It almost managed 13 mm/s and would conclude 12 mm/s is the top speed for one pass.
Engraving Ability
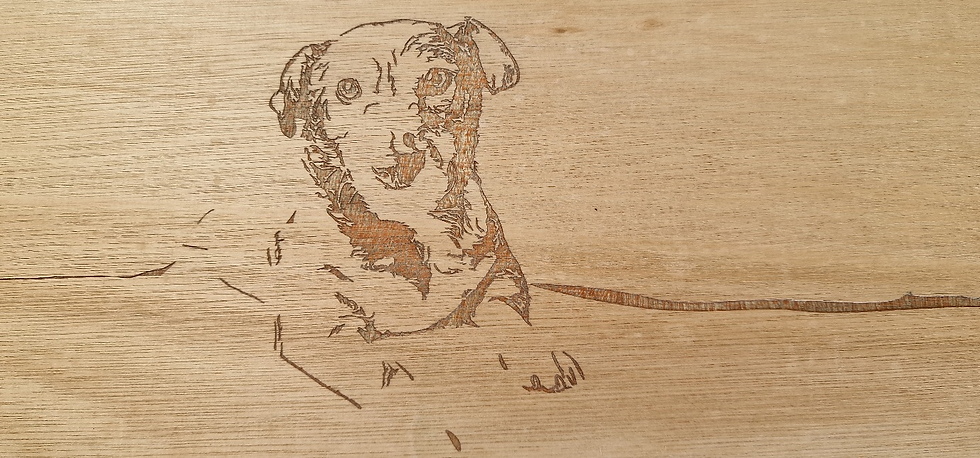
We have been running a small project for one of our clients. Above, you can see an engraving of a dog. This was a vector file, where the engraving was set to Infill in Lightburn. The settings in this instance were 600 mm/s at 100% power. This gave a lovely depth of engraving of about 0.5 mm on hardwood ply.
Test Piece Cutting Findings
These test pieces are only a small snapshot when cutting a small area with the best conditions. The reality of cutting a larger area, will be a lot different, when you take into consideration material thickness variations, warping etc. Even with plywood, you need to also consider the variations in the bonding agents between each layer. For example, we cut a large area of some 12 mm thick hardwood ply and the reality for a clear one pass cut ended up being closer to 4 mm/s. MDF is a much more controlled stable material and will have more consistency. We don’t use MDF often, so we have not tested it in this blog. Based on the performance of the hardwood ply, we are sure the results will be similar.
When cutting solid wood, the performance will be a lot better, as the laser does not need to tackle all the bonding agents and other additives. We do know that the XTool 40W laser could easily cut through a 21 mm thick piece of pine in one pass, so the assumptions would be surpassed by the Laser Tree K60 module.
Lessons Learned

When we first switched on the laser module, we thought we would try to cut a piece of 12 mm hardwood ply, that was not of a good quality and had inconsistent bonding agents. We had found that the XTool 40 W laser could barely cut a third of the way through it. We put the Laser Tree module up for the challenge, and yes it did manage to cut through it and the wood did flame up a bit. The result was us damaging the the protective lens.

Here you can clearly see how the protective lens has become damaged. What has happened, is a build up of soot from the cutting has collected on the exposed surface and then the laser beam has focused its energy on that, engraving the glass face of the protective lens. This of course will deem the lens useless from this point on. Luckily Laser Tree supply two spare protective Lenses, so we were quickly up and running again. It is important that you clean the protective lens as often as possible. Even without a poor material like the one we tested; soot will build up on the exposed surface of the lens. Just using a cotton bud and cleaning the surface with alcohol will give it a longer life span.
We use the Print & Cut feature a lot in Lightburn. This allows you to split the cut into two sections using markers, and pick up the piece from that point, while indexing the material along. This gives you the ability to cut longer pieces of material if you have a pass through. It is important that you have accuracy when locating these markers. Using the fire button on the laser can be difficult to see with such a large laser module. We opted to use the crosshair, so it was important that we had an accurate offset in the settings.
After a bit of trial and error, the offset settings were +0.5 mm on the X and +37.5 mm on the Y. Now this may be unique for our machine, however, by running a test, you should find the optimum point. Laser Tree have given the offset as X = 0 mm and Y = -38 mm. Again, this maybe unique to us.
We also found out that the laser module will warn you when it gets too hot. After a long duration the temperature indicator was at 50 degrees C, a high pitch alarm went off. We were running in an ambient temperature of around 25 degrees C to start with. It mentions this on page 5 of the manual stating that the alarm can be switched off by pressing the power switch once.
K60W Pros and Cons
Pros
This is of course a very powerful laser module, giving you the ability to cut through thicker materials much faster and thus improving your production time.
The price tag is very competitive for a very powerful piece of kit.
Maintenance is a breeze when compared to other laser modules on the market. Having the ability to clean the cooling fans is a big plus.
Fairly simple to upgrade your existing laser. This is very compatible to XTools and fits the existing 40W sliding plate.
Very good quick responsive support from Laser Tree.
Very good clear concise manual, where nothing has been lost in translation.
Two spare protective lenses.
Everything you need in the supplied kit to get up and running, less the compatible connection cable.
Works seamlessly with Lightburn and your existing equipment.
Cons
No flame alarm.
The driver adapter board could be better packaged, to easily fit to your existing equipment.
A loss of working area (approx. 10 mm in both x and y), based on the bulky size.
If you have limit switches, you may need to come up with a work around as this module is much bigger.
Conclusions
Firstly, we are not affiliated to Laser Tree, so these 3 blogs are an honest review.
The set-up was easier than we originally thought and dealing with the cable management was probably the most difficult part. Having said that, we did have the whole thing up and running in no time at all.
We believe that the Pros far outweigh the the cons, and we now have a laser than can quickly run our jobs providing cleaner cuts on the edges and allowing us to increase our product range on more robust designs. If one day Laser Tree find a way to integrate the Driver Adapter into the Laser Module, this will make the set-up so much easier and lessen the cable management and be a big plus.
All in all, Default Interactive would have no hesitation to recommend Laser Tree as an upgrade to your existing piece of kit.

Looking for a lasertree Interface Driver Adapter Board 2.0*1 that came with the k60 to adapt to another machine . they sell the universal one on there site and amazon . K60 has a differant ribon cable and does not work with the universal adapter